
How to Setup Hik-Connect
Scroll down to read the full Hik-connect guide or click a link below to jump to a section;
- Download this guide for printing
- Enabling Hik-Connect using a screen attached to the recorder
- Enabling Hik-Connect Using a computer and web browser
- Register and add a device to your account
- Sharing a Hik-Connect device to another user's account
- Disabling or Deleting a Shared Device
To use Hik connect your Hikvision recorder must be connected to your internet router either by direct connection or by using powerline adapters. Please make sure this connection is up and running before proceeding.
Enabling Hik-Connect using a screen attached to the recorder. (Easiest method)
- From the main screen, right click anywhere and then click Menu (on some firmware versions a menu may appear at the top when right clicked) either login with your password or pattern then click the settings cog.
- Click network down the left-hand side then TCP/IP (or basic on some recorders) and tick the Enable DHCP box then click apply
- Click the Advanced menu under network then the platform access header
- Under access type make sure Hik-Connect is selected then tick Enable and follow the instructions by accepting the terms and setting a verification code. Once complete click "apply" at the bottom.
- Leave this menu then re-enter it to see if registration status says Online - if it says offline then you are either not connected or there are issues with your network settings.
Enabling Hik-Connect Using a computer and web browser (requires some computer knowledge).
- Open the web browser on your PC.
- Input the device IP address and press the Enter key on your keyboard.
(To find the ip address of your recorder download and install SADP from here your device if connected will appear in sadp,
tick the box beside your device then put a tick in the "enable dhcp" box on the right, type your recorders admin password then press modify. Click refresh and make a note of the IPv4 address, this is the one you will need to type in the web browser) - Input the device user name and the device password to login.
- Tap Configuration – Network – Advanced Settings – Platform Access to enter the Platform Access page.
- Check Enable.
The system will set Hik-Connect as the platform access mode by default.
Note: If it is the first time enabling the Hik-Connect service, you should create a device verification code. - Tap Save to save the settings.
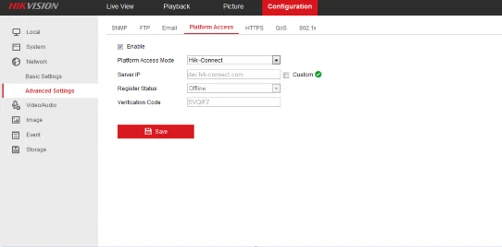
- Once completed refresh the page (or go to another menu then back) and check the register status is set to online, if it says offline then you are either not connected or there are issues with your network settings.

Register and add a device to your account.
- Download and install the Hik-connect app from the following locations;
For Apple devices download Hik-connect from the Appstore
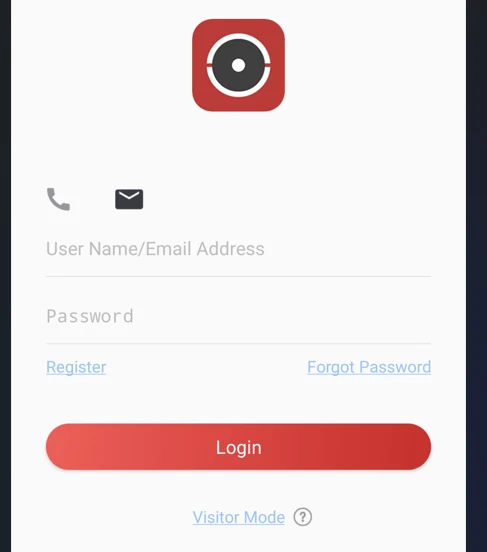
For Android devices download "Hik-Connect for end user" from https://appstore.hikvision.com - Once downloaded and installed open the app from the main screen click register (in blue)
- Agree to the terms and select your country, then you will have the choice to register by either phone number or email address, we recommend email address as it is easiest to use and share. To register with phone number follow the instructions on screen, to register with email address click "register by email address" at the bottom of the screen then follow the on screen instructions.
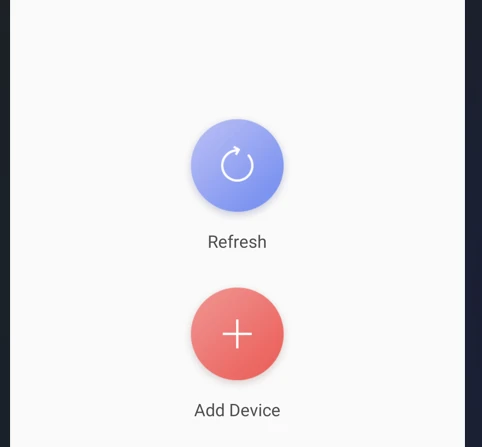
- Once you get to the screen below click the red + "add device" button
- you can then scan the QR code from the recorders Hik-connect menu as used in step 3 or alternatively you can click the pencil icon in the top right to be presented with a manual entry version – in here enter the devices 9 digit serial number This will be printed either on the box or on the unit itself. Once entered press the save icon in the top right
- You may be asked for the verification code when adding, this will be what you entered earlier on the Hik-connect menu pages.
- Follow the instructions on screen to complete.
When you first login to a device and click the live view you may be asked for your verification code again (it may ask for encryption code but this is the same thing) just enter it once then reload the live view.
Sharing a Hik-Connect device to another user's account.
- Make sure your other user registers or logs into their own Hik-connect account on their device following the instructions under "Register and add a device to your account" then from a device signed into your account click the share icon
 next to the device you want to share then click share with user.
 - Enter their email address or phone number (whichever they registered their account with) then if found click add recipient (you can enter a remark or label for this user if you choose) then press the tick.
- Select the user from the history list then press Next at the bottom of the screen.
- Tick which cameras or devices you would like to share then press Next
- From this screen you can select the permissions you want to apply – you can limit playback and other features once your happy with the set permissions click Finish.
- On the other users device open the app and you should be given an notice to accept the shared device, click accept then access this user should be able to access the device as normal.
Disabling a Shared Device.
- From the main users Hik-connect app, click the More menu at the bottom then click "Manage Sharing Settings". From this menu you can delete any devices you are sharing as well as any devices shared to you.
Last Updated 28/06/2024 using app 6 and firmware version 4
